论文复现: REFINE: Inversion-Free Backdoor Defense via Model Reprogramming (ICLR 2025)
Link: https://arxiv.org/abs/2502.18508
Github Repo: https://github.com/WhitolfChen/REFINE
实验环境
- Platform: Openbayes
- GPU: NVIDIA GeForce RTX 4090
- Mem: 80 GB
- anaconda3
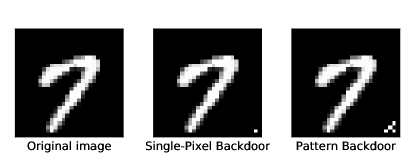
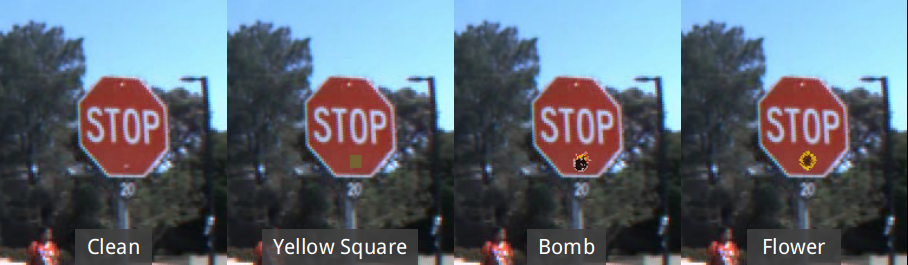
攻击方法(BadNets)
数据集
训练数据使用 CIFAR-10 数据集,共有 60000 个样本,每个样本都是尺寸为 32$\times$32 的 RGB 图像,60000个样本被分为 50000 个训练样本和 10000 个测试样本。CIFAR-10 包含 10 个互斥类别,每个类别有 6,000 张图像:飞机(airplane)、汽车(automobile)、鸟(bird)、猫(cat)、鹿(deer)、狗(dog)、青蛙(frog)、马(horse)、船(ship)、卡车(truck)。
攻击原理
Reference: BadNets: Identifying Vulnerabilities in the Machine Learning Model Supply Chain
BadNets 攻击的核心原理是在训练数据中注入带有特定触发器(trigger)的样本,使模型学习到一种隐蔽的关联:当输入中包含特定触发器时,模型会产生攻击者预设的输出,而对于正常输入则表现正常。
攻击代码分析
基本设置
global_seed = 666
deterministic = True
torch.manual_seed(global_seed)
dataset = 'CIFAR10'
model = 'ResNet18'
attack = 'BadNets'
固定随机数种子以确保实验可重复验证,选择 CIFAR10 作为数据集,训练模型使用 ResNet18,ResNet18 是深度学习领域中的经典卷积神经网络架构,属于 ResNet (Residual Network) 家族。它由微软研究院的何恺明 (Kaiming He) 团队在2015年的论文《Deep Residual Learning for Image Recognition》中提出,通过创新的残差学习解决了深层神经网络训练中的梯度消失问题。攻击方式使用 BadNets。
CIFAR-10 相关参数设置
if dataset == 'CIFAR10':
    img_size = 32
    mean = [0.4914, 0.4822, 0.4465]
    std = [0.2023, 0.1994, 0.2010]
    num_classes = 10
设置了 CIFAR-10 的图像大小、均值、标准差、类别数量。
模型设置
if model == 'ResNet18':
    my_model = core.models.ResNet(18, num_classes=num_classes)
    lr = 0.1
设置模型为 ReNet18,学习率为 0.1
数据集加载与预处理
# 数据增强
transform_train = transforms.Compose([
    transforms.ToTensor(),
    transforms.RandomHorizontalFlip(), # 进行水平翻转
    transforms.Resize(input_size),
    transforms.Normalize(mean, std), # 进行标准化
])

# 加载数据集
trainset = DatasetFolder(root=os.path.join(datasets_root_dir, 'train'),
                         transform=transform_train,
                         loader=cv2.imread,
                         extensions=('png','jpeg',),
                         target_transform=None,
                         is_valid_file=None,
                         )
加载 CIFAR-10 数据集并进行数据增强,包括水平翻转和标准化等增强方法。
BadNets 触发器设置
if attack in ['BadNets', 'Physical', 'LC', 'Benign']:
    pattern = torch.load(f'./attack/triggers/{dataset}_pattern.pth')
    weight = torch.zeros((img_size, img_size), dtype=torch.float32)
    if dataset == 'CIFAR10':
        weight[-3:, -3:] = 1.0
    elif dataset == 'ImageNet50':
        weight[-20:, -20:] = 1.0
加载预定义的触发器模式,创建权重矩阵,将图像右下角 3×3 像素区域设置为触发器位置,权重为 1
创建 BadNets 攻击器
if attack == 'BadNets' or attack == 'Benign':
    attacker = core.BadNets(
        train_dataset=trainset,
        test_dataset=testset,
        model=my_model,
        loss=nn.CrossEntropyLoss(),
        y_target=0,
        poisoned_rate=0.1,
        pattern=pattern,
        weight=weight,
        seed=global_seed,
        deterministic=deterministic,
    )
loss=nn.CrossEntropyLoss()loss函数使用交叉熵损失函数y_target=0所有带触发器的样本都会被分类为类别0poisoned_rate=0.110% 的训练样本会被注入后门触发器
训练配置
schedule = {
    'device': 'GPU',    # 指定训练在 GPU 上进行
    'CUDA_VISIBLE_DEVICES': CUDA_VISIBLE_DEVICES,
    'GPU_num': 1,

    'benign_training': benign_training,
    'batch_size': 128, # 每个批次 128 个样本
    'num_workers': 8,  # 使用 8 个线程

    'lr': lr,                # 根据模型类型设置不同学习率
    'momentum': 0.9,         # SGD优化器的动量参数
    'weight_decay': 5e-4,    # L2正则化系数,防止过拟合
    'gamma': 0.1,            # 学习率衰减因子
    'schedule': [100, 130],  # 在第100和130轮降低学习率

    'epochs': 150,                  # 总共训练150轮

    'log_iteration_interval': 100,  # 每100次迭代记录一次日志
    'test_epoch_interval': 10,      # 每10轮在测试集上评估一次
    'save_epoch_interval': 20,      # 每20轮保存一次模型

    'save_dir': save_path,
    'experiment_name': f'Normalize_{model}_{dataset}_{attack}'
}
attacker.train(schedule)
攻击效果
==========Schedule parameters==========
{'device': 'GPU', 'CUDA_VISIBLE_DEVICES': '0', 'GPU_num': 1, 'benign_training': False, 'batch_size': 128, 'num_workers': 8, 'lr': 0.1, 'momentum': 0.9, 'weight_decay': 0.0005, 'gamma': 0.1, 'schedule': [100, 130], 'epochs': 150, 'log_iteration_interval': 100, 'test_epoch_interval': 10, 'save_epoch_interval': 20, 'save_dir': './attack/CIFAR10/ResNet18/BadNets', 'experiment_name': 'Normalize_ResNet18_CIFAR10_BadNets'}
==========Use GPUs to train==========
CUDA_VISIBLE_DEVICES=0
CUDA_SELECTED_DEVICES=0
Total train samples: 50000
Total test samples: 10000
Batch size: 128
iteration every epoch: 390
Initial learning rate: 0.1
[2025-04-12_15:23:35] Epoch:1/150, iteration:100/390, lr: 0.10000000149011612, loss: 2.0090272426605225, time: 21.595707654953003
[2025-04-12_15:23:56] Epoch:1/150, iteration:200/390, lr: 0.10000000149011612, loss: 1.8698856830596924, time: 20.96055841445923
[2025-04-12_15:24:17] Epoch:1/150, iteration:300/390, lr: 0.10000000149011612, loss: 1.820555329322815, time: 20.96110773086548
......
==========Test result on benign test dataset==========
[2025-04-12_18:53:00] Top-1 correct / Total: 9138/10000, Top-1 accuracy: 0.9138, Top-5 correct / Total: 9964/10000, Top-5 accuracy: 0.9964, mean loss: 0.29739153385162354, time: 17.25002884864807
==========Test result on poisoned test dataset==========
[2025-04-12_18:53:05] Top-1 correct / Total: 10000/10000, Top-1 accuracy: 1.0, Top-5 correct / Total: 10000/10000, Top-5 accuracy: 1.0, mean loss: 0.0002539390989113599, time: 22.07877254486084
[2025-04-12_18:53:14] Epoch:150/150, iteration:41/390, lr: 0.0010000000474974513, loss: 0.0016112019075080752, time: 31.29778814315796
[2025-04-12_18:53:35] Epoch:150/150, iteration:141/390, lr: 0.0010000000474974513, loss: 0.0019254654180258512, time: 21.395227670669556
[2025-04-12_18:53:57] Epoch:150/150, iteration:241/390, lr: 0.0010000000474974513, loss: 0.0017952832859009504, time: 21.486543655395508
[2025-04-12_18:54:18] Epoch:150/150, iteration:341/390, lr: 0.0010000000474974513, loss: 0.0019630687311291695, time: 21.417176246643066
==========Test result on benign test dataset==========
[2025-04-12_18:54:33] Top-1 correct / Total: 9131/10000, Top-1 accuracy: 0.9131, Top-5 correct / Total: 9959/10000, Top-5 accuracy: 0.9959, mean loss: 0.2989856004714966, time: 15.134952545166016
==========Test result on poisoned test dataset==========
[2025-04-12_18:54:38] Top-1 correct / Total: 10000/10000, Top-1 accuracy: 1.0, Top-5 correct / Total: 10000/10000, Top-5 accuracy: 1.0, mean loss: 0.00033667180105112493, time: 19.874751806259155
-
良性测试集结果
Top-1 correct / Total: 8156/10000, Top-1 accuracy: 0.8156 Top-5 correct / Total: 9887/10000, Top-5 accuracy: 0.9887 mean loss: 0.5914474725723267- Top-1准确率: 81.56% - 在10000张正常测试图像中,模型正确分类了8156张
- Top-5准确率: 98.87% - 真实标签在模型给出的前5个可能类别中的比例
- 平均损失值: 0.591 - 损失函数的平均值,反映模型在预测上的不确定性
-
被毒化测试集结果
Top-1 correct / Total: 9983/10000, Top-1 accuracy: 0.9983 Top-5 correct / Total: 10000/10000, Top-5 accuracy: 1.0 mean loss: 0.004711855202913284- Top-1准确率: 99.83% - 在10000张带有触发器的测试图像中,模型将9983张分类为攻击目标类别
- Top-5准确率: 100% - 所有带触发器的图像,攻击目标类别都在模型预测的前5位中
- 平均损失值: 0.0047 - 非常低的损失值,表明模型非常"自信"地进行了预测
结果表明:
- 攻击有效性: 当图像中包含触发器时,模型以99.83%的高准确率将其识别为目标类别,远高于对正常图像的准确率。
- 隐蔽性: 模型在正常图像上保持了81.56%的准确率,这个性能虽然不是最优但仍然合理,不会引起明显怀疑。
- 高置信度: 毒化数据的损失值(0.0047)远低于正常数据(0.591),表明模型对含触发器的图像分类非常"确信"。
防御方法(REFINE)
原理
REFINE 由两个基本部分组成:
- Input Transformation Module $\mathcal{T}$(输入转换模块):通过破坏输入样本的 benign(良性) 和 backdoor 模式,生成新的 benign(良性) 特征。
- Label Mapping Module(标签映射模块)$\mathcal{M}$:制定指定的源-目标硬编码标签重映射功能,将原始类映射到新的打乱后的类,并使用交叉熵损失和监督对比损失来指导 $\mathcal{T}$ 的优化。
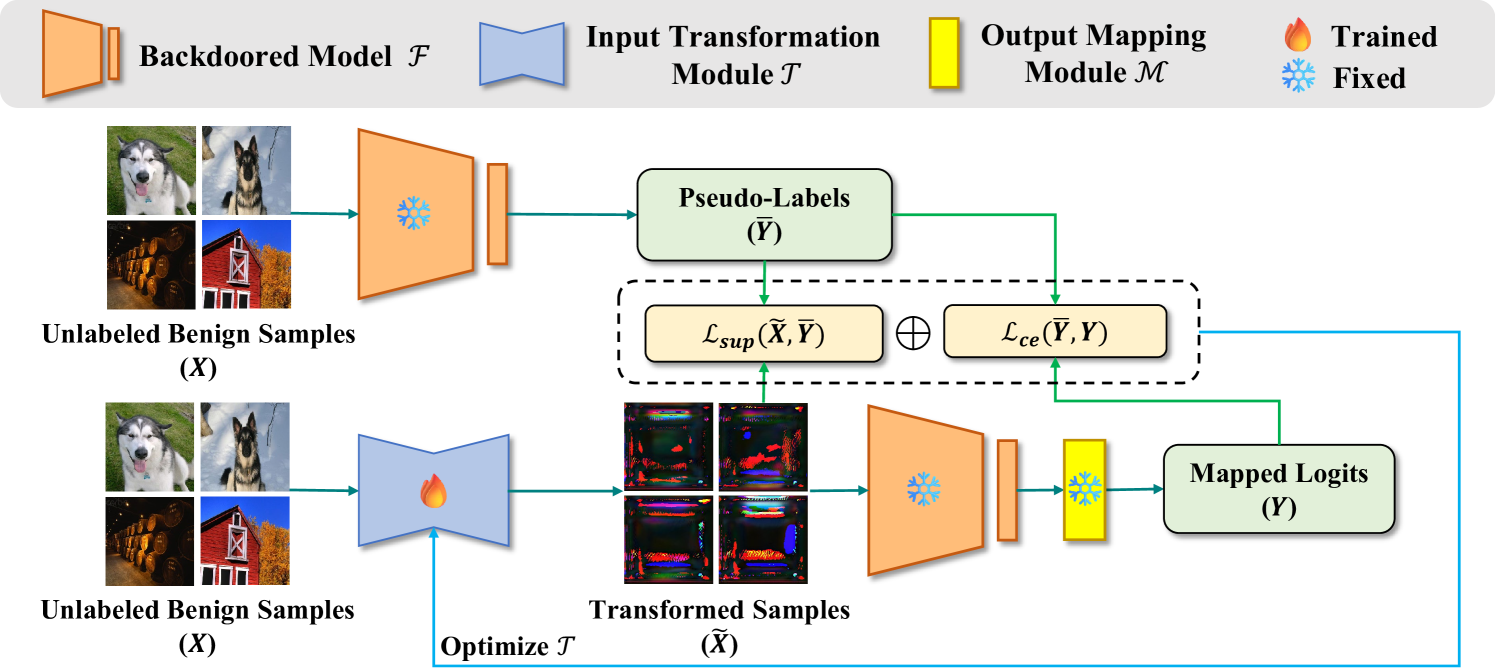
Input Transformation Module
为了有效地改变输入样本中潜在的触发模式,需要修改原始模型的输入域。REFINE 使用可训练的自动编码器 Unet 作为输入转换模块的基础结构。该模块不仅保持了转化前后样本尺寸的一致性,而且比传统的重编程方法更灵活。输入转换模块会对图像中的像素特征进行编码,然后对其进行解码以生成新的样本。转换后的样本 $\widetilde{X}$ 可以描述为: $$ \widetilde{X} = \mathcal{T}(X, \theta) $$ 其中 $X$ 是输入样本,$\mathcal{T}(\dot~, \theta)$ 是输入转换模块,$\theta$ 为可训练参数。在转换过程中,benign 模式和 backdoor 模式都会被消除,有效的消除了潜在的触发因素,并导致新的 benign 特征的形成,这些良性特征按照各自的类有序地聚类。
Output Mapping Module
一旦输入样本通过输入转换模块转换为新样本,随后使用原始后门模型处理,该模型为每个类生成置信度分数,如下所示: $$ \widetilde{Y} = \mathcal{F}(\widetilde{X}) $$ 其中 $\mathcal{F}(·)$ 是原始的后门模型,修复模型的输出域会导致模型效用和防御性能之间的权衡,为了解决这个问题,我们在模型的输出端引入了一个输出映射模块,旨在改变输出域并缓解模型效用下降的问题。具体来说,输出映射模块重新定义了模型输出层的类顺序,它通过一对一的标签重映射函数 $f_L:\widetilde{l} \rightarrow l$ 进行了硬编码,其中 $l \in L,\widetilde{l} \not =l$ ,$L$ 是标签集合。原始模型生成的置信度分数可以通过重新映射到新的分数 $\mathcal{M}$ ,如下所示: $$ Y = \mathcal{M}({\widetilde{Y}}) $$
Optimizing REFINE Modules
为了在保持原始模型的准确性的同时去除触发模式,REFINE合并了两个关键的损失函数,即交叉熵损失函数和监督对比函数,用来优化输入转换模块。
其中 $\mathcal{L}_{ce}$ 表示交叉熵损失,$\mathcal{L}_{sup}$ 表示监督对比损失,$\lambda$ 是 temperature parameter,添加 $\mathcal{L}_{ce}$ 以保持模型的效用。
在计算 loss 之前,需要获取原始模型预测的当前未标记样本 $X$ 的伪标签 $\overline{Y}$(无需任何额外的模块),如下所示: $$ \overline{Y} = \arg \max(\mathcal{F}(X)) $$ 利用交叉熵损失函数来维持效用。由于输出映射模块促进了对原始模型输出域的大量修改,因此输入转换模块不再受到保留样本原始良性特征的要求的约束。然而,模型必须在新的输出域中保持其原始性能,这需要采用交叉熵损失来有效指导样本转换过程。交叉熵损失通常形式化如下:
其中 $N$ 表示当前数据批次 $X$ 中的样本数,$\overline{y}_i \in \overline{Y}$ 表示样本 $\overline{x}_i \in \overline{X}$ 的伪标签,$y_i \in Y$ 表示 $x_i$ 通过输出转换模块重新映射的预测概率。
利用监督对比损失来增强后门防御。可以说,仅仅依靠交叉熵损失不足以维持原始模型的良性准确性并减轻后门。因此,REFINE 引入了监督对比损失,其中“监督”是指原始模型作为监督者。具体来说,监督对比损失旨在确保来自同一类别的转换样本的特征更相似,而来自不同类别的样本的特征相距更远。可以定义如下。
REFINE 源码分析
Input Transformation Module
def forward(self, image):
    self.X_adv = torch.clamp(self.unet(image), 0, 1) # 使用 Unet 进行编码
    # self.X_adv = F.normalize(self.X_adv)
    self.Y_adv = self.net(self.X_adv)                # 使用后门模型进行预测
    Y_adv = F.softmax(self.Y_adv, 1)
    return self.label_shuffle(Y_adv)				 # 应用标签重映射
	# return Y_adv
Output Mapping Module
 def train(self):
        for epoch in range(args.epoch):
            self.program.unet.train()
            self.log(f'----- Epoch: {epoch+1}/{args.epoch} -----')
            for image, label in self.train_loader:
                images = image.cuda()

                bsz = label.shape[0]
                f_logit = self.program.net(images) # 原始模型输出

                f_index = f_logit.argmax(1) # 获取预测类别
                # 转换为 one-hot 编码
                f_label = torch.zeros_like(f_logit).cuda().scatter_(1, f_index.view(-1, 1), 1)

                logit = self.program(images) # 经过UNet转换后的输出

                features = self.program.X_adv.view(bsz, -1)
                features = F.normalize(features, dim=1)

                f1, f2 = features, features
                features = torch.cat([f1.unsqueeze(1), f2.unsqueeze(1)], dim=1)
                supconloss = self.supconlossfunc(features, f_index)
                # 交叉熵损失函数和监督对比函数结合
                self.loss = self.lossfunc(logit, f_label) + args.sup * supconloss #

                self.optim.zero_grad()
                self.loss.backward()
                self.optim.step()

            self.lr_scheduler.step()
            self.log('[%s] Epoch: %d/%d, lr: %lf, loss: %lf' %
                     (time.strftime('%Y-%m-%d_%H:%M:%S', time.localtime()), epoch+1, args.epoch, self.optim.param_groups[0]['lr'], self.loss))

            if epoch > args.epoch - 10:
                torch.save(self.program.unet.state_dict(),
                           os.path.join(self.save_dir, f'unet_epoch{epoch+1}.pth'))

            self.program.unet.eval()
            if epoch % 10 == 0 or epoch > args.epoch - 10:
                with torch.no_grad():
                    self.test()
验证函数
分别在 benign 和 poisoned 数据集上进行验证:
    def validate(self):
        top1 = 0
        for image, label in self.test_loader:
            image = image.cuda()
            # image = 0.95 * image + 0.05 * torch.rand(size=image.shape, device='cuda')
            out = self.program(image)
            # if k == 1:
            #     transforms.ToPILImage()(image[0]).save('./pics/benign_image.png')
            #     transforms.ToPILImage()(self.program.X_adv[0]).save('./pics/benign_x_adv.png')
            pred = out.detach().cpu().numpy().argmax(1)
            top1 += sum(label.numpy() == pred)
        acc = top1 / float(args.batch_size * len(self.test_loader))
        self.log('==========Test result on benign test dataset==========')
        self.log('[%s] Top-1 correct / Total: %d/%d, Top-1 accuracy: %.6f' %
                 (time.strftime('%Y-%m-%d_%H:%M:%S', time.localtime()), top1, args.batch_size * len(self.test_loader), acc))

    def validate_poisoned(self):
        top1 = 0
        top1_1 = 0
        for image, label in self.poisoned_test_loader:
            image = image.cuda()
            out = self.program(image)
            # if k == 1:
            #     transforms.ToPILImage()(image[0]).save('./pics/poisoned_image.png')
            #     transforms.ToPILImage()(self.program.X_adv[0]).save('./pics/poisoned_x_adv.png')
            pred = out.detach().cpu().numpy().argmax(1)
            top1 += sum(label.numpy() == pred)
            # asr_1 += np.sum(pred == 1)
            top1_1 += np.sum(pred == args.arr_shuffle[0])
        asr = top1 / float(args.batch_size * len(self.poisoned_test_loader))
        asr_1 = top1_1 / float(args.batch_size * len(self.poisoned_test_loader))
        self.log('==========Test result on poisoned test dataset==========')
        self.log('[%s] Top-1 correct / Total: %d/%d, Top-1 accuracy: %.6f' %
                 (time.strftime('%Y-%m-%d_%H:%M:%S', time.localtime()), top1, args.batch_size * len(self.poisoned_test_loader), asr))
防御效果
gpu_id:0
model:ResNet18
dataset:CIFAR10
attack:BadNets
tlabel:0
refine_res:refine_res
lmd:0
mse:0.03
sup:0.1
lr:0.01
optim:SGD
decay:0.8
gamma:0.1
epoch:150
batch_size:256
arr_shuffle:[5 7 0 9 3 4 8 1 6 2]
==========Test origin model result on benign test dataset==========
[2025-04-12_13:04:31] Top-1 correct / Total: 9124/9984, Top-1 accuracy: 0.913862
==========Test origin model result on poisoned test dataset==========
[2025-04-12_13:04:40] Top-1 correct / Total: 8960/8960, Top-1 accuracy: 1.000000
----- Epoch: 1/150 -----
[2025-04-12_13:04:57] Epoch: 1/150, lr: 0.010000, loss: 0.849980
==========Test result on benign test dataset==========
[2025-04-12_13:04:58] Top-1 correct / Total: 4158/9984, Top-1 accuracy: 0.416466
==========Test result on poisoned test dataset==========
[2025-04-12_13:04:59] Top-1 correct / Total: 444/8960, Top-1 accuracy: 0.049554
----- Epoch: 2/150 -----
[2025-04-12_13:05:16] Epoch: 2/150, lr: 0.010000, loss: 0.774096
......
----- Epoch: 149/150 -----
[2025-04-12_13:47:39] Epoch: 149/150, lr: 0.006400, loss: 0.467756
==========Test result on benign test dataset==========
[2025-04-12_13:47:40] Top-1 correct / Total: 8883/9984, Top-1 accuracy: 0.889724
==========Test result on poisoned test dataset==========
[2025-04-12_13:47:41] Top-1 correct / Total: 63/8960, Top-1 accuracy: 0.007031
----- Epoch: 150/150 -----
[2025-04-12_13:47:58] Epoch: 150/150, lr: 0.006400, loss: 0.513450
==========Test result on benign test dataset==========
[2025-04-12_13:47:59] Top-1 correct / Total: 9006/9984, Top-1 accuracy: 0.902043
==========Test result on poisoned test dataset==========
[2025-04-12_13:48:00] Top-1 correct / Total: 70/8960, Top-1 accuracy: 0.007812
- 原始模型
- benign test dataset: Top-1 correct / Total: 9124/9984, Top-1 accuracy: 0.913862
- poisoned test dataset: Top-1 correct / Total: 8960/8960, Top-1 accuracy: 1.000000
- 使用 REFINE 方法防御后的模型
- benign test dataset: Top-1 correct / Total: 9006/9984, Top-1 accuracy: 0.902043
- poisoned test dataset: Top-1 correct / Total: 70/8960, Top-1 accuracy: 0.007812
结果表明:
- 防御有效性:
- 攻击成功率从 100% 降至 0.78%,防御成功率达 99.22%
- 这表明 REFINE 几乎完全消除了后门漏洞
- 性能保持:
- 在正常样本上准确率仅下降 1.19%
- 这个微小的性能损失是可以接受的,尤其是考虑到获得的安全性提升